
I started working on some project ideas that I could teach at my local STEM studio. Here is the first project! I thought I would give a little tutorial on how to do it yourself!
Supplies:
-
LED Sequins
-
Hot Glue
-
Canvas (you can buy them black already, or paint it black)
-
Paint (your choice on color. I had black, white, magenta, and phthalo blue)
-
Paint brushes! Helpful to have a large one to paint the background and a medium flat to do the fun space clouds
-
Conductive thread
-
Sewing Needle
-
A puncturing tool (a screwdriver with a sharp point can work)
-
Sewable battery pack with coin battery
Step 1: Paint it black! Paint the whole canvas black! If you bought a black canvas, skip this step! Make sure to wait until it dries before you go to the next step.
Step 2: Paint on your clouds! You can use a crisscross motion to blend your blues and reds into the black. It is nice to have the black dry, because the black would otherwise dominate the other colors and it would be harder to get the other colors to pop. Add some white to your blues and reds to bring out the brightest parts of the clouds. Water down your white a bit, and dip your brush in the white paint. Now spatter the stars on by flicking your finger across the bristles. Once you are happy, let it dry! I suggest not having too big of star spatters as it can be distracting from the LEDs.
Step 3: Pick your constellation and draw it out. You’ll need to flip it so that you can draw it on the back of the canvas and have it read correctly on the front. This is fun! Mirroring can be hard for some, so you might need to help. Once you have it drawn out, draw the stars out on the back of the canvas.
Step 4: Draw out your LEDs, just a little cylinder with a positive and negative indicator. Draw a line connecting all the positive dots together and the negative dots together. Make sure they do NOT cross lines. You may need to rotate your LEDs to avoid any of this. Decide where you want to but your battery pack.
Step 5: Heat up that glue gun. You’ll need it soon! Now, poke your holes where the stars are!
Step 6: Glue down all the LEDs with the LED poking through the holes in the canvas. Make sure your positive and negatives are oriented correctly with your diagram. If you are like me, you might have to do some last minute changes to the plan. Don’t worry about it if this happens to you too. Just make sure your positive and negative lines don’t cross! Careful you didn’t align the tiny resistor with the hole instead of the LED. It’s the larger bump on the sequin.
Step 7: Now you an sew the LEDs to the canvas. Using the conductive thread. Sew three stitches onto each end and just stretch the thread over to the next LED. Connect all the positives together in one line and lead it back to the positive battery. Now connect all the negatives together and lead it back to the negative side of the battery. There are actually two positives and two negative sides of the battery, so you can actually split the LEDs up and use either side. As long as positives go to positive and negatives go to negative.
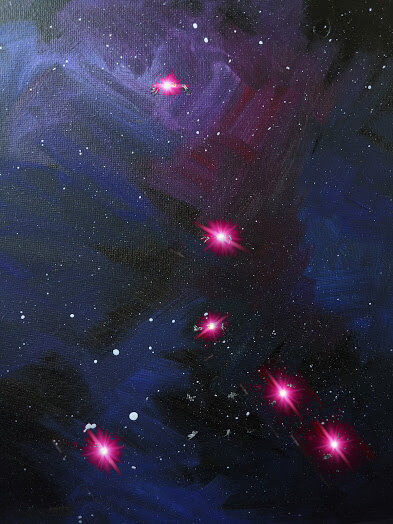
Step 8: Slip the battery into the pack and turn it on!!! Flip that guy over and marvel at your finished project. If you want, you can connect the stars with a dotted line using some white paint or paint some shiny lines on each LED to add emphasis to the stars. Up to you!
TROUBLESHOOTING: It didn’t turn on! 🙁
-
Make sure your positive and negative strings aren’t touching anywhere.
-
Make sure you have a working battery.
-
Make sure your sequins aren’t flipped anywhere.
Sewing Tip:
-
It’s east to tangle up your conductive thread because it can crimp super easy. I suggest not trying to sew your whole project with a single piece of thread. Do it in sections so you aren’t fighting with a tangled thread. It will save you the headache, although it feels like it will take longer.
-
Make sure you are using a needle with a large enough eye for the thread, or else it is going to be super annoying to keep threading your needle with each piece of thread.


